How to install maven in windows 10

Prerequisites

  • A system running Windows.
  • A working Internet connection.
  • Access to an account with administrator privileges.
  • Access to the command prompt.
  • A copy of Java installed and ready to use, with the JAVA_HOME environment variable set up (learn how to set up the JAVA_HOME environment variable in our guide to installing Java on Windows).

How to Install Maven on Windows

Follow the steps outlined below to install Apache Maven on Windows.

Step 1: Download Maven Zip File and Extract

1. Visit the Maven download page and download the version of Maven you want to install. The Files section contains the archives of the latest version. Access earlier versions using the archives link in the Previous Releases section.

2. Click on the appropriate link to download the binary zip archive of the latest version of Maven. As of the time of writing this tutorial, that is version 3.8.4.


3. Since there is no installation process, extract the Maven archive to a directory of your choice once the download is complete. For this tutorial, we are using C:\Program Files\Maven\apache-maven-3.8.4.


Step 2: Add MAVEN_HOME System Variable

1. Open the Start menu and search for environment variables.

2. Click the Edit the system environment variables result.


3. Under the Advanced tab in the System Properties window, click Environment Variables.


4. Click the New button under the System variables section to add a new system environment variable.


5. Enter MAVEN_HOME as the variable name and the path to the Maven directory as the variable value. Click OK to save the new system variable.


Step 3: Add MAVEN_HOME Directory in PATH Variable

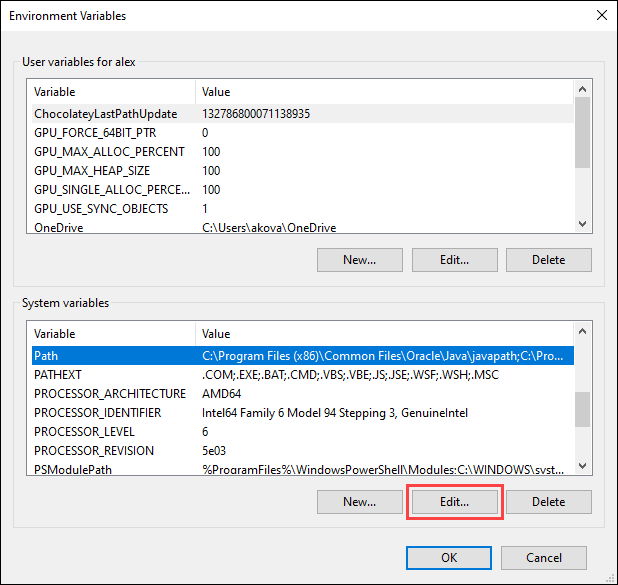
1. Select the Path variable under the System variables section in the Environment Variables window. Click the Edit button to edit the variable.


2. Click the New button in the Edit environment variable window.


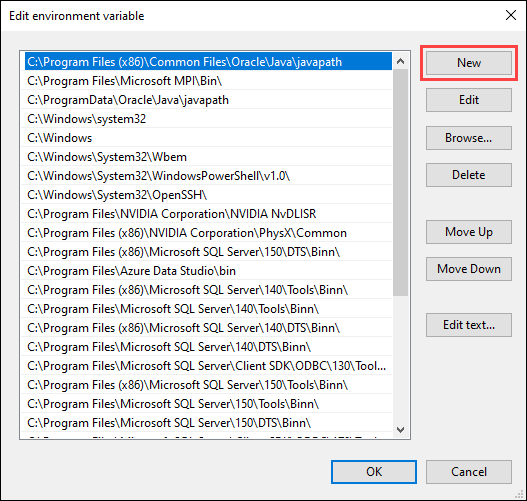
3. Enter %MAVEN_HOME%\bin in the new field. Click OK to save changes to the Path variable.


Note: Not adding the path to the Maven home directory to the Path variable causes the 'mvn' is not recognized as an internal or external command, operable program or batch file error when using the mvn command.

4. Click OK in the Environment Variables window to save the changes to the system variables.


Step 4: Verify Maven Installation

In the command prompt, use the following command to verify the installation by checking the current version of Maven:

mvn -version


How to Use Docker in Localhost


Click officially Website docker

Overview of Docker Desktop

Docker Desktop is a one-click-install application for your Mac, Linux, or Windows environment that lets you to build, share, and run containerized applications and microservices.

It provides a straightforward GUI (Graphical User Interface) that lets you manage your containers, applications, and images directly from your machine. Docker Desktop can be used either on its own or as a complementary tool to the CLI.

Docker Desktop reduces the time spent on complex setups so you can focus on writing code. It takes care of port mappings, file system concerns, and other default settings, and is regularly updated with bug fixes and security updates.


Docker Desktop works with your choice of development tools and languages and gives you access to a vast library of certified images and templates in Docker Hubopen_in_new. This allows development teams to extend their environment to rapidly auto-build, continuously integrate, and collaborate using a secure repository.

System requirements


  • WSL version 1.1.3.0 or later.

  • Windows 11 64-bit: Home or Pro version 21H2 or higher, or Enterprise or Education version 21H2 or higher.

  • Windows 10 64-bit: Home or Pro 21H2 (build 19044) or higher, or Enterprise or Education 21H2 (build 19044) or higher.

  • Turn on the WSL 2 feature on Windows. For detailed instructions, refer to the Microsoft documentationopen_in_new.

  • The following hardware prerequisites are required to successfully run WSL 2 on Windows 10 or Windows 11:


download
Install Docker Desktop
Install Docker Desktop on MacWindows, or Linux.


Which Database using in Firebase

Firebase: Realtime Database

The Firebase Realtime Database is a cloud-hosted database in which data is stored as JSON. The data is synchronized in real-time to every connected client. You can easy way use in your Apps in firebase. All of our clients share one Realtime Database instances and automatically receive updates with the newest data, when we build cross-platform applications with our iOS, and JavaScript SDKs.

The Firebase Realtime Database is a NoSQL database from which we can store and sync the data between our users in real-time. You can update, delete, create usign firebase.

The Realtime database helps our users collaborate with one another. It ships with mobile and web SDKs, which allow us to build our app without the need for servers. 


Key capabilities

Real-time

The Firebase Real-time database uses data synchronization instead of using HTTP requests.

Offline

The Firebase Database SDK persists our data to disk, and for this reason, Firebase apps remain responsive even when offline.

Accessible from client devices

There is no need for an application server to access the Firebase Real-time database. We can access it directly from a mobile device or web browser.


How can use Pagination in swiper slide in Ionic 6


<ion-content fullscreen class="ion-padding ion-text-center" scroll-y="false">

  <swiper-container [pagination]="{ clickable: true }">

    <swiper-slide *ngFor="let s of slides" >

      <img src="{{s.image}}" />  

      <div class="slide" >

        <h2>{{s.title}}</h2>

        <p>

         {{s.para}}

        </p>

        <ion-button color="tertiary"  (click)="goToHome()" shape="round">

          {{s.btnText}}

        </ion-button>

      </div>

    </swiper-slide>

  </swiper-container>

  <!-- slides.component.html -->

</ion-content>


Other Property also can you can use

[loop]="true" [autoHeight]="true" [allowTouchMove]="false"

[autoplay]="{ delay: 1000, disableOnInteraction: false }" [pagination]="{ clickable: true }" [navigation]="true"


'gradlew' is not recognized as an internal or external command, operable program or batch file.

 'gradlew' is not recognized as an internal or external command,

operable program or batch file.


Howto use ion slider in Ionic 6 - angular

First, update to the latest version of Ionic:

npm install @ionic/angular@latest

Once that is done, install the Swiper dependency in your project:

npm install swiper@latest


Add code homeslider.page.html

<ion-content fullscreen class="ion-padding" scroll-y="false"> <swiper-container> <swiper-slide *ngFor="let s of slides"> <img src="{{s.image}}" /> <div class="slide" > <h2>{{s.title}}</h2> <p> {{s.para}} </p> <ion-button color="tertiary" (click)="goToHome()" shape="round"> {{s.btnText}} </ion-button> </div> </swiper-slide> </swiper-container> <!-- slides.component.html --> </ion-content>

Add homeslider.ts


import { register } from 'swiper/element/bundle'; register();


WCF Error "This could be due to the fact that the server certificate is not configured properly with HTTP.SYS in the HTTPS case

 Error  :an error occurred while making the http request to url. this could be due to the fact that the server certificate is not configured properly with http.sys in the https case. this could also be caused by a mismatch of the security binding between the client and the server.

ANS


System.Net.ServicePointManager.SecurityProtocol = SecurityProtocolType.Tls12;

How to check Network in Ionic 6 ?


 install


Step 1 : npm install @capacitor/network 

Step 2 :   

 import { Network } from '@capacitor/network

 constructor() {

    this.checkNetworkConnection();

  }

checkNetworkConnection(){

  Network.addListener('networkStatusChange', status => {

  console.log('Network status changed', status);

});

const logCurrentNetworkStatus = async () => {

  const status = await Network.getStatus();

  console.log('Network status:', status);

};

}


Generate Signed APK: Errors while building APK. You can find the errors in the 'Messages' view.

Issue:

Cause: error: invalid source release: 17


First Check Your Java Version :  Java --version

Solution:

   1. Source Compatibility : $JavaVersion.VERSION_11 

   2. Target Compatibility : $JavaVersion.VERSION_11


Error: self signed certificate in certificate chain

 Downloading and extracting tabs starter Error: self signed certificate in certificate chain

at TLSSocket.onConnectSecure (node:_tls_wrap:1532:34)

at TLSSocket.emit (node:events:527:28)

at TLSSocket._finishInit (node:_tls_wrap:946:8)


Solution: Run Below cmd:


set NODE_TLS_REJECT_UNAUTHORIZED=0


The project is using an incompatible version (AGP 8.0.0) of the Android Gradle plugin. Latest supported version is AGP 7.2.2

 Still no luck, I’ve deleted the empty line. Actually, if I use AGP 8.0.0-beta01 it works, but I consider not upgrading to AGP 8 yet and waiting for stable version. I end up using AGP 7.4.0 and add this in gradle.properties

android.enableNewResourceShrinker=false

Seems like they have a bug in the new shrink method and fixed in Gradle 8. ref:

AGP 8.0.0

Step:1


Step ; 2


commonly used in modern ASP.NET Core apps more examples using fetch + Blob in JavaScript to download files PDF, Excel

 Let’s explore real-world examples using the fetch + blob pattern, targeting different file types and scenarios. ✅ 1. Download Static PD...

Best for you